The Ultimate Guide: How to Build a Concrete Koi Pond That You Will Love
Introduction to Building a Concrete Koi Pond
There is nothing more relaxing than listening to the sound of water in your garden. If you love having a pond in your garden, you might be thinking about building your own concrete koi pond. However, building a concrete koi pond requires a lot of planning, effort, and patience. In this ultimate guide, you will learn everything you need to know about how to build a concrete koi pond that you will love.
Step 1: Planning for Your Concrete Koi Pond
Before you start building your concrete koi pond, you need to consider a few things. First, think about the location of your pond. Make sure it is not too close to trees or shrubs. If it is, you will have to deal with falling leaves, debris, and the roots of the plants.

Second, consider the size of your pond. The size of your pond will depend on the number of koi fish you want to keep. A good rule of thumb is to have one cubic meter of water for every koi fish. So, if you want to keep 6 koi fish, you will need a pond that is at least 6 cubic meters.

Third, consider the depth of your pond. Koi fish need a deep pond to thrive. The depth of your pond should be at least 1 meter deep, but preferably 1.5 meters deep. This will allow your koi fish to swim freely and avoid predators.

Fourth, think about the design of your pond. Do you want a formal or informal design? Do you want a waterfall or fountain? Do you want a natural-looking pond or a modern pond? Consider your personal style and the overall look of your garden.

Once you have considered all these factors, it is time to move on to the next step: designing your pond.
Step 2: Designing Your Concrete Koi Pond
Designing your concrete koi pond is crucial, as it will determine the final look and function of your pond. Here are some tips to help you design your pond:
Tip 1: Start with a Sketch
Start by sketching out your pond on paper. Use graph paper to scale your design. This will help you to visualize your pond and make changes before you start building.
Tip 2: Consider the Traffic Flow
Consider the traffic flow around your pond. Will you need a pathway or seating area around your pond? Make sure to include these features in your design.
Tip 3: Think About Safety
Safety is important, especially if you have children or pets. Make sure your pond is not too close to your house or patio, and that it has a barrier to prevent anyone from accidentally falling in.
Tip 4: Consider the Environment
Consider the environment around your pond. Will it be in a sunny or shady area? Will it be exposed to strong winds? These factors will affect the design of your pond.
Once you have designed your pond and finalized the plan, it is time to move on to the next step: building your pond.
Step 3: Building Your Concrete Koi Pond
Building your concrete koi pond can seem overwhelming, but with these tips, you can do it yourself:
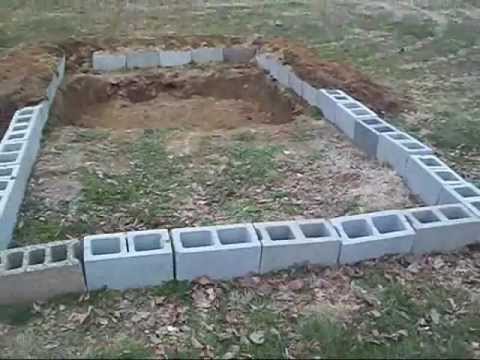
Tip 1: Excavation
Start by excavating the area where your pond will be. Make sure to follow your design plan and excavate to the correct depth.
Once you have excavated the area, you need to prepare the base for your pond. Make sure the base is level, and add a layer of sand or gravel to prevent punctures in your liner.
Tip 2: Reinforcement
Reinforce your pond walls and bottom with rebar and wire mesh. This will prevent your pond from cracking over time.
Tip 3: Pouring the Concrete
Mix and pour the concrete for your pond. You can use a wheelbarrow or concrete mixer to mix your concrete. Pour the concrete in sections, and smooth it out with a trowel.

Make sure to add drain pipes and a skimmer to your pond. This will allow you to easily drain and clean your pond.
Tip 4: Adding the Liner
After the concrete has cured, it is time to add the liner. Use a high-quality liner that is made for ponds and is UV-resistant. Make sure to leave some extra liner around the edges of your pond.
Tip 5: Adding the Water and Finishing Touches
After you have added the liner, it is time to add the water. Let the water sit for a few days before adding your koi fish. This will allow the water to stabilize and the pH to balance.

Finally, add some finishing touches to your concrete koi pond. Add plants, rocks, and other decorations to give your pond a natural look.
Conclusion
Building a concrete koi pond is a rewarding and satisfying project. With these tips, you can design and build a beautiful pond that you and your koi fish will love. So, get started today and enjoy the peacefulness and beauty of your own pond!