DIY Koi Pond Settlement Chamber: The Ultimate Guide to Building One Yourself
Introduction
If you’re the proud owner of a koi pond, then you already know the importance of creating an environment for your fish that is as close to their natural habitat as possible. One of the key components of any koi pond is the settlement chamber, also known as a sedimentation chamber or settling tank. In this article, we’ll take a detailed look at what a settlement chamber is, why it’s important and how you can build one yourself, saving yourself both time and money.
What is a Koi Pond Settlement Chamber?
Before diving into the specifics of how to build a koi pond settlement chamber, it’s important to first understand what it is and why it’s so important.
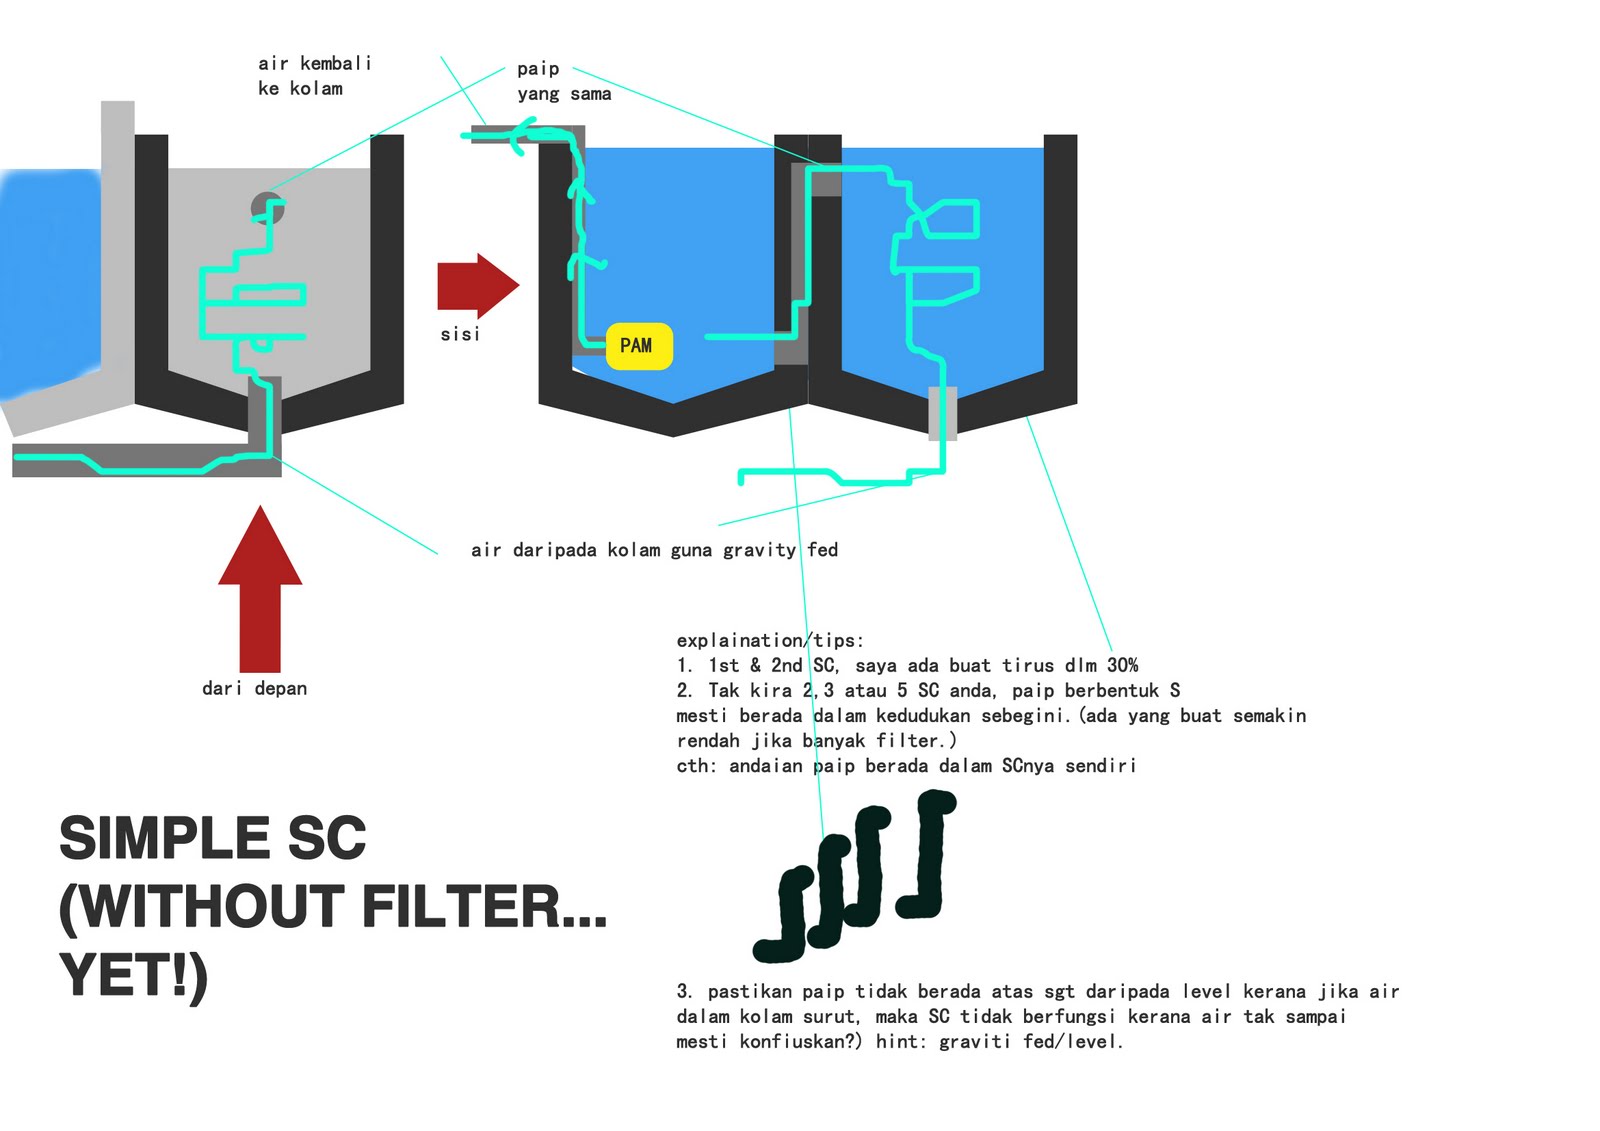
A settlement chamber is a part of a koi pond’s filtration system that is designed to remove larger particles such as fish waste, uneaten food, and leaves from the water. These particles can build up over time and create a dirty, unhealthy environment for your fish. They can also affect the water quality and cause it to become cloudy.

The settlement chamber acts as a physical barrier, allowing the larger particles to sink to the bottom of the chamber where they can be easily removed. It’s an important part of the overall filtration system and helps to keep the water in your koi pond clean and healthy for your fish.
Why Build a DIY Koi Pond Settlement Chamber?
Building a DIY koi pond settlement chamber is a great way to save money and customize your filtration system to fit your specific needs. It can also be a fun weekend project for you and your family to work on together.

A DIY settlement chamber can be built using a variety of materials, including PVC piping, plastic containers or even concrete. You can create one to fit the size and shape of your koi pond, ensuring that it works as efficiently as possible.
How to Build a DIY Koi Pond Settlement Chamber
Building a settlement chamber for your koi pond is a relatively straightforward process that can be accomplished with just a few tools and materials. Here’s how to do it:
Materials
- PVC piping or plastic container
- PVC glue or silicone adhesive
- 90-degree elbows and T-joints (if using PVC piping)
- Hacksaw or reciprocating saw
- Measuring tape
- Level
- Gravel or rocks
- Filter matting or floss
Step 1: Determine the Size and Placement of Your Settlement Chamber
The first step in building your DIY koi pond settlement chamber is to determine where you want to place it and how big it needs to be. A good rule of thumb is to have a settlement chamber that is at least 20% of the total volume of your pond.
For example, if you have a 1,000-gallon koi pond, your settlement chamber should be a minimum of 200 gallons. This will ensure that it can effectively remove the larger particles from the water.
Once you’ve determined the size you need, mark out the location where the settlement chamber will go. Make sure it’s level and at a convenient location for you to remove and clean it regularly.
Step 2: Choose Your Materials
You can either use PVC piping or a plastic container for your settlement chamber, depending on your preferences and the size of your pond.
If you’re going the PVC route, you’ll need to purchase the appropriate 90-degree elbows and T-joints that fit the diameter of your piping. You’ll also need PVC glue to secure everything in place.
If you’re using a plastic container, make sure it’s large enough to hold the volume of water you need it to. You’ll also need to cut holes in the top and bottom for the inlet and outlet pipes.
Step 3: Assemble Your Settlement Chamber
Once you have your materials ready, it’s time to start assembling your settlement chamber. Here’s how to do it:
- If using PVC piping, cut the piping to the appropriate lengths using a hacksaw or reciprocating saw. Make sure the ends are straight and even.
- Glue the 90-degree elbows and T-joints onto the piping to create the desired shape.
- If using a plastic container, cut the inlet and outlet holes and make sure they are smooth and even.
- Connect the piping to the inlet and outlet holes, using silicone adhesive or PVC glue to secure them in place.

Step 4: Install Your Settlement Chamber
After you have assembled your settlement chamber, the next step is to install it in your koi pond.
Place your settlement chamber in the location you designated, and ensure it’s level. Cover the bottom of the chamber with a layer of gravel or rocks to create a level surface.
Cut a piece of filter matting or floss to cover the top of the chamber, and secure it in place with a zip tie or other fastener. This will act as a filter, preventing any large particles from escaping the chamber.

Step 5: Monitor and Clean Your Settlement Chamber
Once your settlement chamber is installed, it’s important to monitor it regularly to ensure it’s working properly.
Check the water level regularly and top up if necessary. You should also remove any debris or leaves that have collected on the top of the filter matting or floss, and wash it out regularly to ensure it’s not clogged with excess debris.
By keeping your settlement chamber clean and maintained, you can ensure your koi pond stays healthy and your fish are happy.
Conclusion
Building a DIY koi pond settlement chamber is a simple and rewarding project that can help keep your koi pond clean and healthy for your fish. By following the steps outlined above, you can create a settlement chamber that fits the size and shape of your pond. Remember to monitor and clean it regularly for the best results.
