Create a Gorgeous DIY Koi Pond Shower Filter in 7 Easy Steps
The Ultimate Guide to Building Your Own Koi Pond Shower Filter
Koi ponds are a beautiful addition to any garden or backyard. They provide a serene place to relax and enjoy the colorful fish swimming around. However, maintaining the water quality is essential to keep the koi healthy. By installing a DIY koi pond shower filter, you can ensure the water stays clean and clear.

What is a Koi Pond Shower Filter?
A koi pond shower filter is a water treatment system that filters out debris, fish waste, and chemicals from the water. This type of filter uses a series of showerheads to spray water above the pond. As the water falls back into the pond, it creates aeration and oxygenates the water. The filter media in the shower filter removes unwanted particles and impurities, resulting in crystal clear water.
Why Should You Install a Koi Pond Shower Filter?
Installing a koi pond shower filter has several benefits. First and foremost, it helps keep the water clear and clean. This is essential for the health of the koi as they are sensitive to water quality. A koi pond shower filter also provides aeration to the water, which helps increase oxygen levels and promotes the growth of beneficial bacteria. Additionally, aeration prevents the pond from becoming stagnant, which can lead to the growth of harmful bacteria.
How to Build a DIY Koi Pond Shower Filter in 7 Steps
Step 1: Gather Materials
To build a DIY koi pond shower filter, you will need the following materials:
- PVC pipes and fittings
- Showerheads
- Filter media (such as sponge or bio-balls)
- Pump
- Drain valve
- Hose and hose clamps
- Silicone adhesive

Step 2: Design the Filter
Design the filter based on the size of your pond and the amount of water it holds. The filter should be able to handle the volume of water and flow rate of the pump. A good rule of thumb is to choose a pump that can circulate the entire volume of water in the pond every hour.
Step 3: Assemble the PVC Pipes and Fittings
Assemble the PVC pipes and fittings according to the design. Use silicone adhesive to seal the joints and prevent leaks. Make sure to include an inlet from the pond and an outlet back to the pond.
Step 4: Install the Showerheads
Install the showerheads on top of the PVC pipes using hose clamps. The showerheads should face downwards and spread out the water evenly. You can use a T-joint to split the water flow between multiple showerheads.

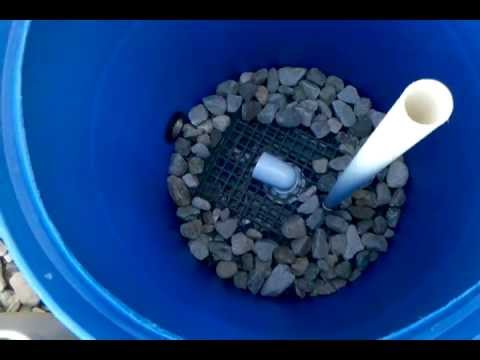
Step 5: Add the Filter Media
Add the filter media to the PVC pipes. The filter media can be sponge or bio-balls. The media should be able to filter out small particles and debris from the water. Pack the media in tightly, but not so tight that water cannot flow through.
Step 6: Install the Pump and Drain Valve
Install the pump in a location near the pond. Make sure to use a submersible pump for safety and efficiency. Connect the pump to the inlet of the filter using a hose and hose clamps. Also, install a drain valve at the bottom of the filter to allow for easy cleaning and maintenance.

Step 7: Test the Filter and Enjoy
Turn on the pump and test the filter. Make sure the water flows evenly through the showerheads and filter media. Adjust the pump flow rate and showerhead angle if necessary. Once everything is working correctly, sit back, and enjoy the crystal clear water in your koi pond.
Conclusion
A DIY koi pond shower filter is a simple and effective way to keep your koi pond water clean and clear. By following these seven easy steps, you can build your own filter and enjoy a beautiful, healthy pond. Remember to choose the right materials and design based on your specific pond size and water volume. Happy building!